

Calling AWS Bedrock from GitHub Actions Without Storing Credentials
How to use OIDC to give your workflows secure, keyless access to Claude and any other Bedrock model

If you’re running Claude in GitHub Actions via the Anthropic API, the setup is straightforward — add an API key as a GitHub secret and you’re done. But in enterprise environments that’s often not an option. Your security policy requires AWS. Your compliance framework mandates data residency. Your billing needs to flow through a single AWS account. Or you simply want Claude to live inside the same security perimeter as the rest of your infrastructure.
That’s where AWS Bedrock comes in. And the right way to connect GitHub Actions to Bedrock isn’t to store AWS credentials as secrets — it’s to use OpenID Connect (OIDC) so your workflows can assume an IAM role directly, with no long-lived credentials anywhere.
I’ll use Claude as the example throughout, but the pattern works for any model you’re invoking through Bedrock.
Why OIDC and not stored credentials
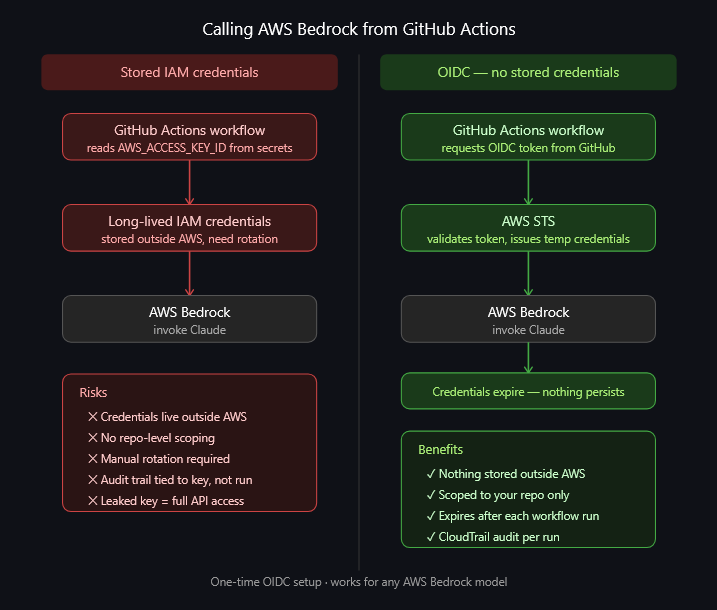
The traditional approach — creating an IAM user, generating an access key, and storing it as a GitHub secret — works, but it has real problems:
Long-lived credentials that need rotating
Credentials that exist outside AWS, in GitHub’s secret store
No straightforward way to scope them to a specific repo or workflow
An audit trail that doesn’t cleanly tie API calls back to individual workflow runs
OIDC solves all of this. GitHub acts as an identity provider, and each workflow run gets a short-lived token that it exchanges for temporary AWS credentials. The credentials are scoped to the role, the role is scoped to the repo, and nothing sensitive is stored anywhere. When the workflow finishes, the credentials expire.
It’s the same pattern AWS recommends for any CI/CD system, and it’s what you should be using if you’re running anything production-grade through GitHub Actions.
What you’re building
By the end of this post you’ll have:
GitHub Actions workflows that can call AWS Bedrock without any stored AWS credentials
An IAM role scoped to your specific repo, assumable only by GitHub Actions
A Bedrock permission policy that follows least privilege
Claude (or any Bedrock model) callable from any workflow in your repo
Step 1 — Add GitHub as an OIDC identity provider in AWS
This tells AWS to trust tokens issued by GitHub Actions. You only need to do this once per AWS account.
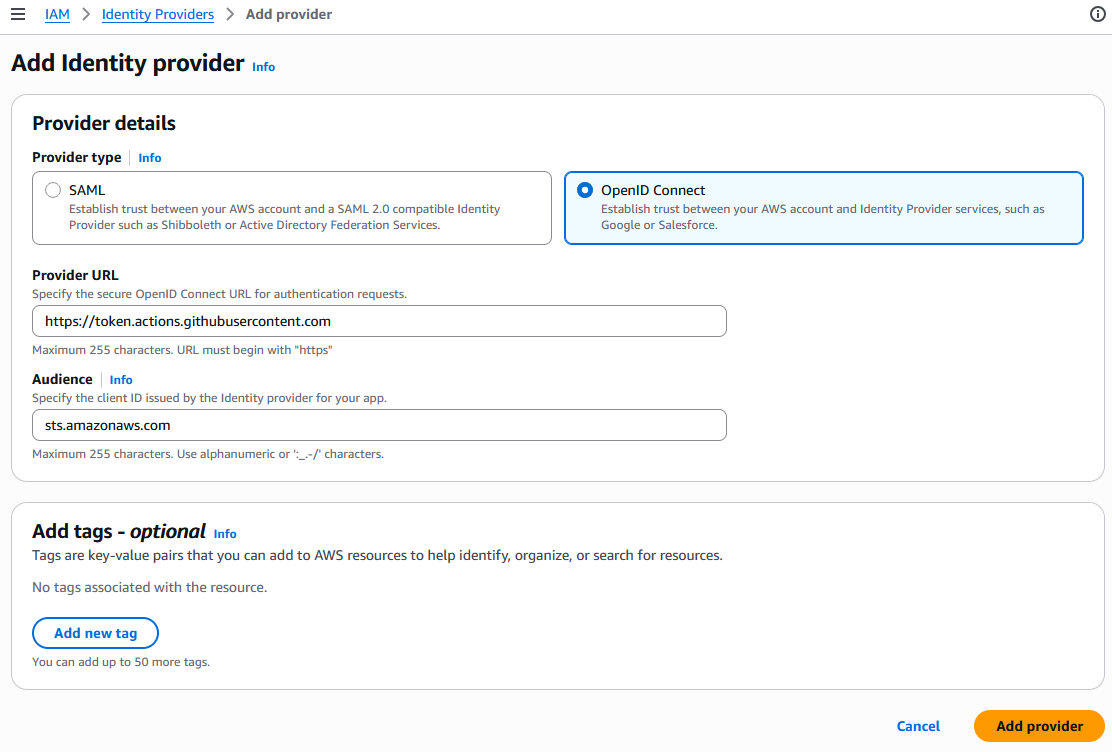
Open the AWS IAM console → Identity providers → Add provider
Select OpenID Connect and set:
Provider URL: https://token.actions.githubusercontent.com
Audience:
sts.amazonaws.com
Click Add provider — AWS now handles the thumbprint automatically
Once this is done, any GitHub Actions workflow can potentially request AWS credentials — but only if an IAM role explicitly trusts it, which is what the next step controls.
Step 2 — Create the IAM role
This role is what your GitHub Actions workflow will assume. The trust policy restricts it to your specific repo.
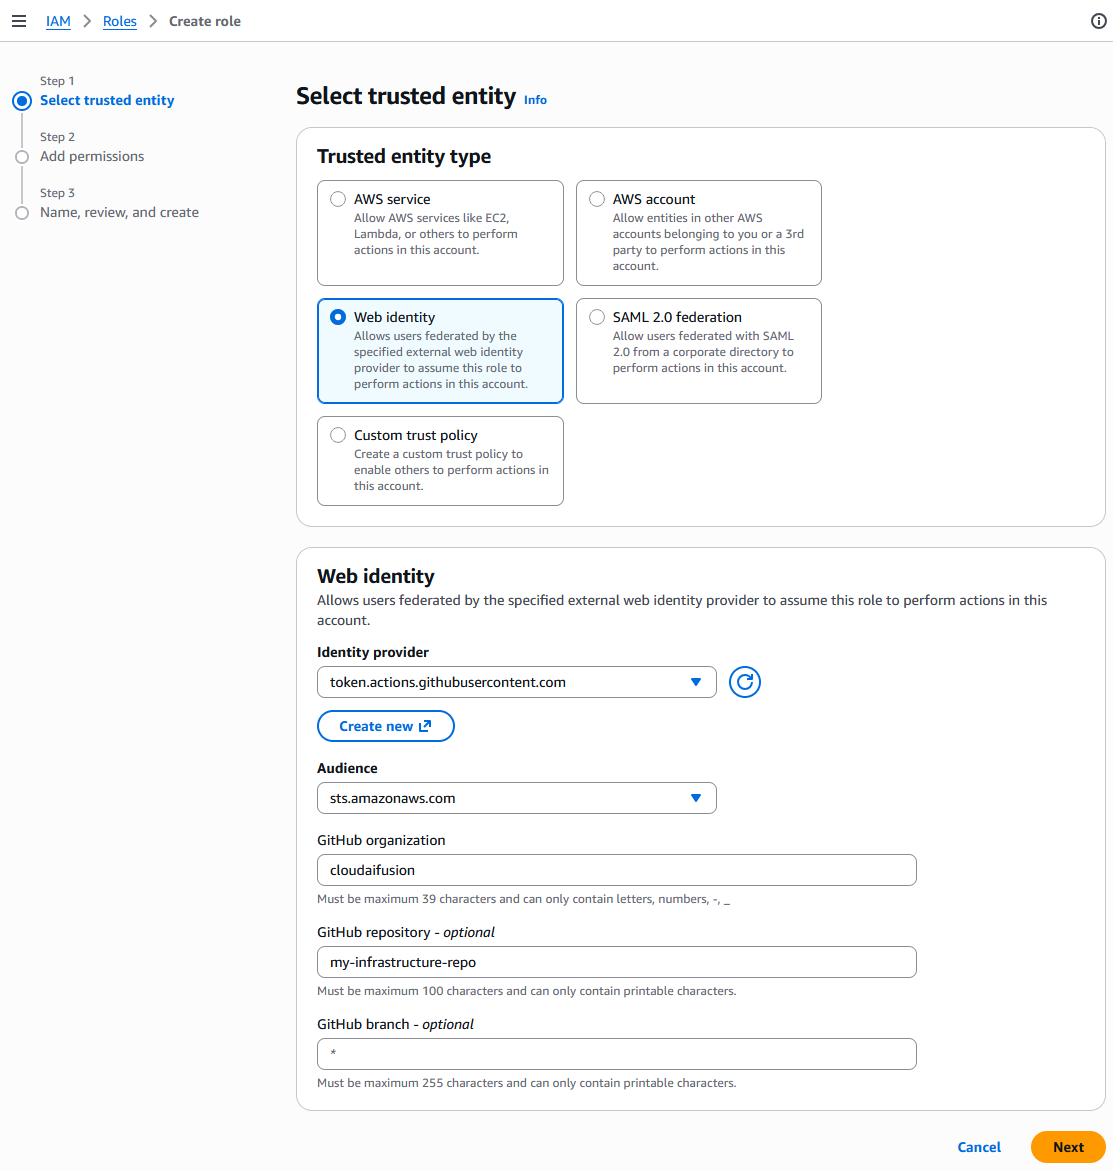
Go to IAM → Roles → Create role
Select Web identity as the trusted entity type
Set the following fields:
Identity provider:
token.actions.githubusercontent.comAudience:
sts.amazonaws.comGitHub organization: Your GitHub org or username (e.g.
cloudaifusion)GitHub repository: The repo where your Terraform lives and your workflow runs (e.g.
my-infrastructure-repo), or*for all repos in the orgGitHub branch: Leave as
*to allow any branch, or specify a branch to restrict further
Important: this should be the repo that contains your Terraform files and your workflow file — the repo that is actually making the AWS API calls. If you’re using a reusable workflow from another repo, the trust policy still needs to reference your repo, not the one where the reusable workflow is defined.
AWS will generate the trust policy condition automatically from these fields — you no longer need to add it manually.
Click Next — AWS will take you to the Add permissions screen
On the Add permissions screen, click Next again without selecting anything — you’ll add the Bedrock policy as an inline policy after the role is created
AWS will show you a Name, review, and create screen. Before creating the role:
Enter a role name (e.g.
github-actions-bedrock)Review the auto-generated trust policy under Step 1: Select trusted entities — confirm it contains
sts:AssumeRoleWithWebIdentityand the correct repo conditionOptionally add tags under Step 3: Add tags
Click Create role
Step 3 — Add the Bedrock permission policy
Once the role is created, open it and add an inline policy:
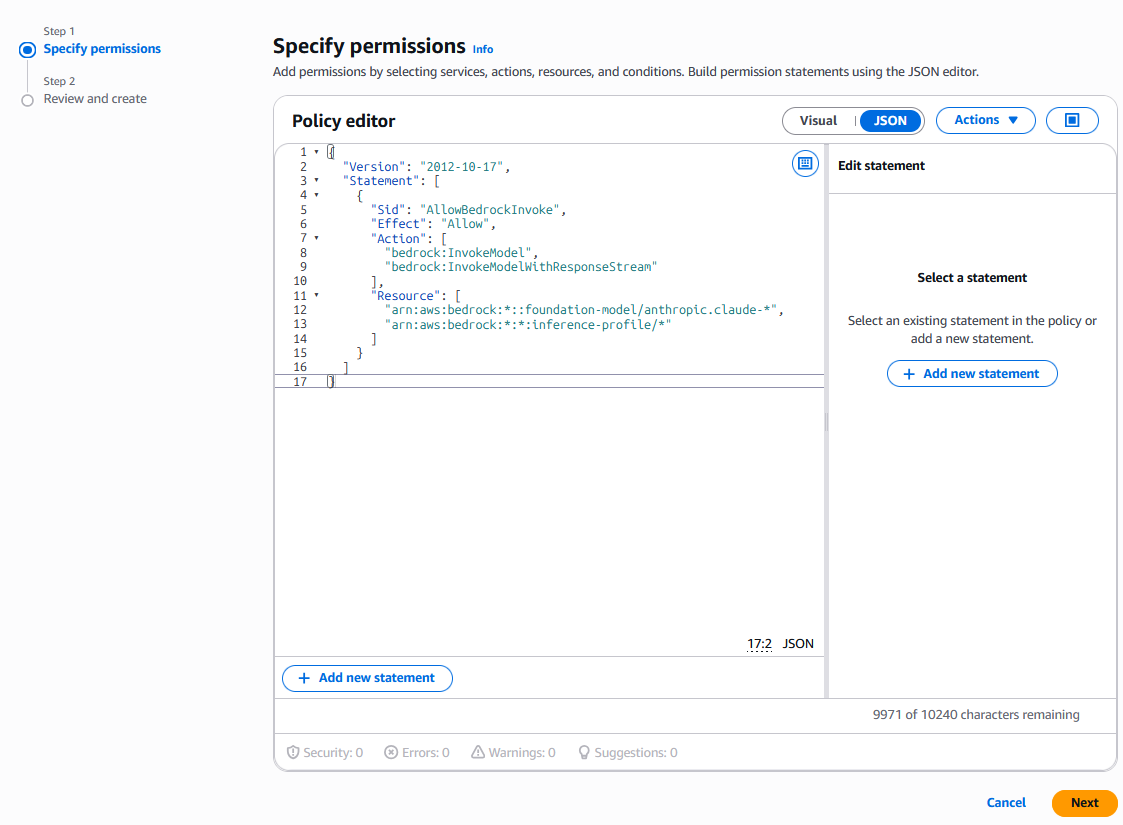
Go to the Permissions tab → Add permissions → Create inline policy
Switch to the JSON editor and paste the following:
{
  "Version": "2012-10-17",
  "Statement": [
    {
      "Sid": "AllowBedrockInvoke",
      "Effect": "Allow",
      "Action": [
        "bedrock:InvokeModel",
        "bedrock:InvokeModelWithResponseStream"
      ],
      "Resource": [
        "arn:aws:bedrock:*::foundation-model/anthropic.claude-*",
        "arn:aws:bedrock:*:*:inference-profile/*"
      ]
    }
  ]
}
Click Next, give the policy a name (e.g.
github-actions-bedrock-policy), and click Create policy
A few things worth noting here:
bedrock:InvokeModel covers standard synchronous calls; bedrock:InvokeModelWithResponseStream covers streaming responses — include both unless you’re certain you won’t need streaming
The foundation-model ARN pattern scopes access to Anthropic Claude models only. Tighten to a specific model ARN if you want to restrict further (e.g. arn:aws:bedrock:eu-west-2::foundation-model/anthropic.claude-sonnet-4-6)
The inference-profile resource is required if you’re using cross-region inference profiles (e.g. eu.anthropic.claude-sonnet-4-6) — these route requests across regions for resilience and Bedrock requires the profile ARN to be explicitly permitted
If you want to allow invocation of any Bedrock model rather than restricting to Claude, you can simplify the resource to "Resource": "*". This is less restrictive but easier to maintain if your model requirements change over time.
Step 4 — Verify the trust policy
On the role’s Trust relationships tab, confirm it looks like this:
{
  "Version": "2012-10-17",
  "Statement": [
    {
      "Effect": "Allow",
      "Principal": {
        "Federated": "arn:aws:iam::YOUR_ACCOUNT_ID:oidc-provider/token.actions.githubusercontent.com"
      },
      "Action": "sts:AssumeRoleWithWebIdentity",
      "Condition": {
        "StringEquals": {
          "token.actions.githubusercontent.com:aud": "sts.amazonaws.com"
        },
        "StringLike": {
          "token.actions.githubusercontent.com:sub": "repo:YOUR_ORG/YOUR_REPO:*"
        }
      }
    }
  ]
}
If it doesn’t match this structure, edit it directly in the console before proceeding.
Step 5 — Complete the Anthropic first-time use form
AWS has retired the Model Access page — serverless foundation models are now automatically available in your account without any manual enablement step.
However, Anthropic models are an exception. Before you can invoke any Claude model via Bedrock, Anthropic requires a one-time use case form to be completed. This only needs to be done once per AWS account (or once at the organisation management account level, which then covers all child accounts).
To complete it:
Open the Amazon Bedrock console
Go to Model catalog and select any Anthropic Claude model
You will be prompted to submit use case details — fill in the form and submit
Access is granted immediately once the form is successfully submitted
If you are using AWS Organizations, completing the form at the management account level via the API covers all child accounts automatically — you won’t need to repeat it per account.
Step 6 — Add the role ARN to GitHub
On the role summary page in IAM, copy the ARN (e.g. arn:aws:iam::123456789012:role/github-actions-bedrock)
Go to your GitHub repo → Settings → Secrets and variables → Actions → Variables tab → New repository variable
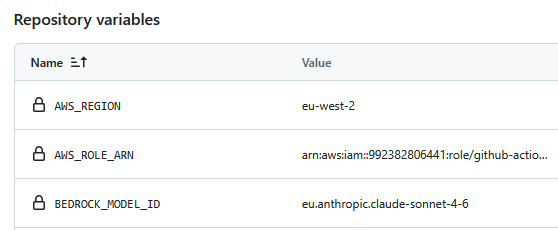
Add the following repository variables:
AWS_ROLE_ARN: The ARN you just copied
AWS_REGION: The region your Bedrock models are in, e.g. eu-west-2
BEDROCK_MODEL_ID: The model you want to invoke, e.g. eu.anthropic.claude-sonnet-4-6
These are repository variables (referenced in workflows as vars.AWS_ROLE_ARN), not environment variables. GitHub Actions environment variables are scoped to specific deployment environments like production or staging — repository variables are available to all workflows in the repo.
Step 7 — Configure your workflow
Create the file .github/workflows/my-workflow.yml in your repo. If the .github/workflows/ directory doesn’t exist yet, create it:
mkdir -p .github/workflows
touch .github/workflows/my-workflow.yml
Then add the following to the file:
name: My Workflow

on:
  pull_request:

jobs:
  my-job:
    runs-on: ubuntu-latest
    permissions:
      contents: read
      id-token: write   # required for OIDC

    steps:
      - uses: actions/checkout@v4

      - name: Configure AWS credentials via OIDC
        uses: aws-actions/configure-aws-credentials@v4
        with:
          role-to-assume: ${{ vars.AWS_ROLE_ARN }}
          aws-region: ${{ vars.AWS_REGION }}

      - name: Call Bedrock
        env:
          BEDROCK_MODEL_ID: ${{ vars.BEDROCK_MODEL_ID }}
          AWS_REGION: ${{ vars.AWS_REGION }}
        run: |
          pip install boto3
          python scripts/call_bedrock.py
Commit and push the file to your repo:
git add .github/workflows/my-workflow.yml
git commit -m "Add Bedrock workflow"
git push
The workflow will trigger on every pull request. If you want to test it manually before opening a PR, add workflow_dispatch: to the on: block — this adds a Run workflow button in the GitHub Actions tab.
The id-token: write permission is what allows the workflow to request an OIDC token from GitHub. Without it, the configure-aws-credentials action will fail. The rest is handled automatically — the action exchanges the OIDC token for temporary AWS credentials and sets them as environment variables for subsequent steps.
Using a reusable workflow? If you’re calling a reusable workflow (e.g. one shared across repos via uses: your-org/your-repo/.github/workflows/my-workflow.yml@main), the aws-actions/configure-aws-credentials step is likely already handled inside the reusable workflow itself. In that case you don’t need to add it here — just pass the aws_role_arn, aws_region, and any other Bedrock inputs as
withparameters to the reusable workflow and let it handle the rest. Check the reusable workflow’s documentation to confirm.
Creating the script
Create scripts/call_bedrock.py in your repo — this is the script the workflow calls:
import boto3
import json
import os

bedrock = boto3.client("bedrock-runtime", region_name=os.environ["AWS_REGION"])

response = bedrock.invoke_model(
    modelId=os.environ["BEDROCK_MODEL_ID"],
    body=json.dumps({
        "anthropic_version": "bedrock-2023-05-31",
        "max_tokens": 1000,
        "messages": [
            {"role": "user", "content": "who was the last person to walk on the moon"}
        ]
    })
)

result = json.loads(response["body"].read())
print(result["content"][0]["text"])
No API keys. No secrets. The boto3 client picks up the temporary credentials that configure-aws-credentials set as environment variables, and Bedrock handles the rest. Replace "who was the last person to walk on the moon" with whatever you want Claude to do.
Your repo structure should look like this:
your-repo/
├── scripts/
│   └── call_bedrock.py
└── .github/
    └── workflows/
        └── my-workflow.yml
Using Claude Code CLI instead of boto3? If you’re running agentic tasks with the claude CLI rather than making direct API calls, the approach is slightly different. After the configure-aws-credentials step, set CLAUDE_CODE_USE_BEDROCK=1 as an environment variable and pass --model with your Bedrock model ID:
export CLAUDE_CODE_USE_BEDROCK=1
claude -p "who was the last person to walk on the moon" --model eu.anthropic.claude-sonnet-4-6
The CLI picks up the AWS credentials from the environment automatically — no script needed.
Step 8 — Trigger it with a PR
Make a small change on a new branch and open a PR to trigger the workflow:
git checkout -b test/bedrock-oidc
echo "# test" >> README.md
git add README.md
git commit -m "Test Bedrock OIDC workflow"
git push -u origin test/bedrock-oidc
Then open a PR from test/bedrock-oidc into main on GitHub. The workflow will trigger automatically.
To watch it run:
Go to your repo → Actions tab
Select My Workflow from the left sidebar
Click the running workflow to see the live logs
A successful run will show the Configure AWS credentials via OIDC step completing without errors, followed by the Call Bedrock step printing Claude’s response to the logs.
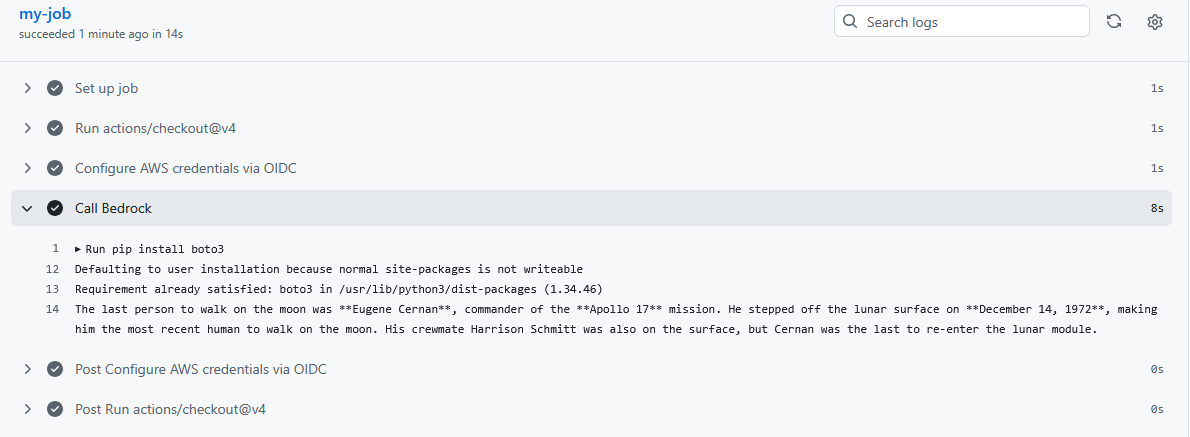
If something goes wrong, the logs will tell you which step failed — check the troubleshooting section below for the most common errors.
How this compares to storing credentials
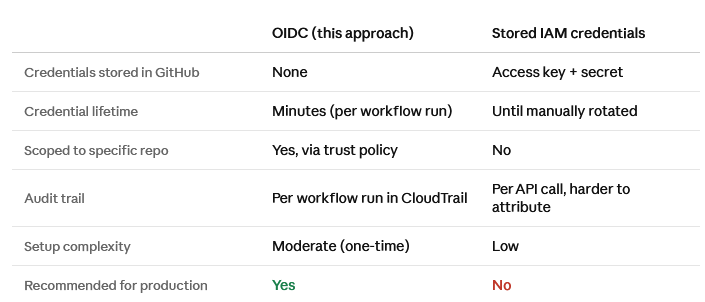
The one-time setup cost of OIDC pays for itself immediately in reduced credential management overhead and a significantly better security posture.
Troubleshooting
Error assuming role: Not authorized to perform sts:AssumeRoleWithWebIdentity The trust policy condition doesn’t match the workflow’s subject claim. Check that the GitHub organization and repository in the trust policy exactly match your repo name, including case.
id-token: write permission missing The workflow job must include id-token: write in its permissions block. If you’ve set top-level permissions in the workflow, make sure id-token: write is included there too.
Could not load credentials from any providers The configure-aws-credentials step didn’t run, failed silently, or the credentials expired before the Bedrock call. Check that the step ran successfully and that your Bedrock call happens in the same job.
You don't have access to the model with the specified model ID The Anthropic first-time use form hasn’t been completed for this AWS account. Go back to Step 5 and complete the form via the Bedrock model catalog — access is granted immediately on submission.
not available on your bedrock (Claude Code CLI) The model ID specified via --model isn’t available in the region you’re using. Check that the cross-region inference profile ID matches your AWS_REGION prefix (e.g. eu.anthropic.claude-sonnet-4-6 for eu-west-2) and that the Anthropic FTU form has been completed.
The broader point
Storing credentials is the path of least resistance, but it’s also the path of most risk. OIDC gives you a cleaner security model, a better audit trail, and no credentials to rotate or accidentally expose — with a setup cost that’s a few hours at most.
If you’re running Claude or any other model through Bedrock in a production environment, this is the setup you should have. The pattern is the same regardless of which model you’re invoking or what your workflow is doing with it.